BaseTileLayer
esri/layers/BaseTileLayerThis class may be extended to create a custom TileLayer. Tile layers are composed of images, such as satellite imagery, that are composed of square tiles mosaicked together in columns and rows, giving the layer the appearance that it is one continuous image. These layers have several levels of detail (LOD) that permit users to zoom in to any region of the map and load additional tiles that depict features in higher resolution at larger map scales.
Tile layers often provide geographic context for other layers such as FeatureLayer and tend to perform better than other layers, such as MapImageLayer and ImageryLayer, that request and display a single image per view.
You can create a custom tile layer by calling createSubclass() on the BaseTileLayer class. You may create a custom tile layer for one of the following reasons:
- The source of the images isn't explicitly supported by the ArcGIS API for JavaScript
- Images need to be preprocessed prior to display in the view
Request images as they are defined
To request images as they are predefined from a data source, overwrite the getTileUrl() method so it returns the URL for the requested tile for a given level, row and column.
var MyCustomTileLayer = BaseTileLayer.createSubclass({
    // properties of the custom tile layer
    properties: {
      urlTemplate: null,
    },

   // override getTileUrl()
   // generate the tile url for a given level, row and column
   getTileUrl: function (level, row, col) {
     return this.urlTemplate.replace("{z}", level).replace("{x}", col).replace("{y}", row);
   }
});
Preprocess images prior to display
If data needs to be preprocessed prior to display, then override the fetchTile() method. For example, if you need to apply a compositing operation to the image returned from the server before the image is displayed then you would override this method.
// override fetchTile() method to process the data returned
// from the server.
 fetchTile: function (level, row, col, options) {
   // call getTileUrl method to construct the Url for the image
   // for given level, row and column
   var url = this.getTileUrl(level, row, col);

   // request for the tile based on the url returned from getTileUrl() method.
   // the signal option ensures that obsolete requests are aborted.
   return esriRequest(url, {
     responseType: "image",
     signal: options && options.signal
   })
   .then(function (response) {
     // when esriRequest resolves successfully,
     // process the image that is returned
     var image = response.data;
     var width = this.tileInfo.size[0];
     var height = this.tileInfo.size[0];

     // create a canvas with a filled rectangle
     var canvas = document.createElement("canvas");
     var context = canvas.getContext("2d");
     canvas.width = width;
     canvas.height = height;

     // Apply the color provided the the layer to the fill rectangle
     if (this.tint) {
       context.fillStyle = this.tint.toCss();
       context.fillRect(0, 0, width, height);
       // apply multiply blend mode to canvas' fill color and the tile
       // returned from the server to darken the tile
       context.globalCompositeOperation = "multiply";
     }
     context.drawImage(image, 0, 0, width, height);
     return canvas;
   }.bind(this));
}
See the following samples for examples of how this works:
If the custom tile layer requires loadable resources, then you must load all loadable dependencies on the layer, within the load() method. Add the promise returned from the loadable resource with the addResolvingPromise() method. The layer will then wait for all of dependencies to finish loading before it is considered loaded.
// Override load method
load: function () {
 // multiply property is an array of ArcGIS cached map services
 this.multiply.forEach(function (layer) {
   // loop through each tile layers and call
   // load method on each layer
   var promise = layer.load();

   // add the promise of each load() method to addResolvingPromise()
   // the custom tile layer will be loaded when every promise is resolved
   this.addResolvingPromise(promise);
 }, this);
}
The layer is responsible for generating the tile URL and fetching tiles from the server for the level, row, and column provided by the LayerView. The LayerView displays the fetched tiles.
Property Overview
| Name | Type | Summary | Class | |
|---|---|---|---|---|
| String | Blend modes are used to blend layers together to create an interesting effect in a layer, or even to produce what seems like a new layer. more details | more details | BaseTileLayer | |
| String | The name of the class. more details | more details | Accessor | |
| Effect | Effect provides various filter functions that can be performed on the layer to achieve different visual effects similar to how image filters work. more details | more details | BaseTileLayer | |
| Extent | The full extent of the layer. more details | more details | Layer | |
| String | The unique ID assigned to the layer. more details | more details | Layer | |
| String | Indicates how the layer should display in the LayerList widget. more details | more details | Layer | |
| Boolean | Indicates whether the layer's resources have loaded. more details | more details | Layer | |
| Error | The Error object returned if an error occurred while loading. more details | more details | Layer | |
| String | Represents the status of a load operation. more details | more details | Layer | |
| Object[] | A list of warnings which occurred while loading. more details | more details | Layer | |
| Number | The maximum scale (most zoomed in) at which the layer is visible in the view. more details | more details | BaseTileLayer | |
| Number | The minimum scale (most zoomed out) at which the layer is visible in the view. more details | more details | BaseTileLayer | |
| Number | The opacity of the layer. more details | more details | Layer | |
| Number | Refresh interval of the layer in minutes. more details | more details | BaseTileLayer | |
| SpatialReference | The spatial reference of the layer. more details | more details | BaseTileLayer | |
| TileInfo | The tiling scheme information for the layer. more details | more details | BaseTileLayer | |
| String | The title of the layer used to identify it in places such as the Legend and LayerList widgets. more details | more details | Layer | |
| String | For BaseTileLayer the type is | more details | BaseTileLayer | |
| Boolean | Indicates if the layer is visible in the View. more details | more details | Layer |
Property Details
- blendMode StringSince: ArcGIS API for JavaScript 4.16
Blend modes are used to blend layers together to create an interesting effect in a layer, or even to produce what seems like a new layer. Unlike the method of using transparency which can result in a washed-out top layer, blend modes can create a variety of very vibrant and intriguing results by blending a layer with the layer(s) below it.
When blending layers, a
top layeris a layer that has a blend mode applied. All layers underneath the top layer arebackground layers. The default blending mode isnormalwhere the top layer is simply displayed over the background layer. While this default behavior is perfectly acceptable, the use of blend modes on layers open up a world of endless possibilities to generate creative maps.The layers in a GroupLayer are blended together in isolation from the rest of the map.
In the following screenshots, the vintage shaded relief layer is displayed over a firefly world imagery layer. The
colorblend mode is applied to the vintage shaded relief and the result looks a new layer.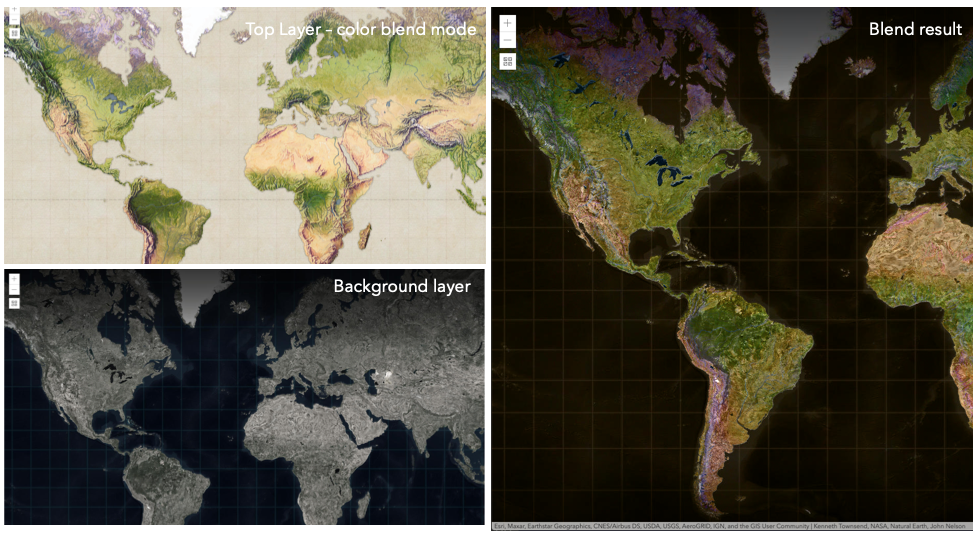
Known Limitations
- The blendMode is not supported in 3D SceneViews.
- The blendMode is not supported in printing and in legend.
The following factors will affect the blend result:
- Order of all layers
- Layer opacity
- Opacity of features in layers
- Visibility of layers
- By default, the very bottom layer in a map is drawn on a transparent background. You can change the MapView's background color.
Read more
Blend mode Description normal The top layer is displayed over the background layer. The data of the top layer block the data of background layer where they overlap. average Takes the mathematical average of top and background layers. Result of averageblend mode is often similar to the effect of setting the layer's opacity to 50%.Lighten blend modes:
The following blend modes create lighter results than all layers. In lighten blend modes, pure black colors in the top layer become transparent allowing the background layer to show through. White in the top layer will stay unchanged. Any color that is lighter than pure black is going to lighten colors in the top layer to varying degrees all way to pure white.
Lighten blend modes can be useful when lightening dark colors of the top layer or removing black colors from the result. The
plus,lightenandscreenmodes can be used to brighten layers that have faded or dark colors on a dark background.Blend mode Description lighten Compares top and background layers and retains the lighter color in the top layer. Colors in the top layer become transparent if they are darker than the overlapping colors in the background layer allowing the background layer to show through completely. Can be thought of as the opposite of darkenblend mode.lighter Colors in top and background layers are multiplied by their alphas (layer opacity and layer's data opacity. Then the resulting colors are added together. All overlapping midrange colors are lightened in the top layer. The opacity of layer and layer's data will affect the blend result. plus Colors in top and background layers are added together. All overlapping midrange colors are lightened in the top layer. This mode is also known as addorlinear-dodge.screen Inverts colors of the background layer and multiplies with colors of the top layer. The resulting colors will be lighter than the original color with less contrast. Screen can produce many different levels of brightening depending on the luminosity values of the top layer. Can be thought of as the opposite of the multiplymode.color-dodge Creates a brighter effect by decreasing the contrast between the top and background layers, resulting in saturated mid-tones and bright highlights. Darken blend modes:
The following blend modes create darker results than all layers. In darken blend modes, pure white in the top layer will become transparent allowing the background layer to show through. Black in the top layer will stay unchanged. Any color that is darker than pure white is going to darken a top layer to varying degrees all the way to pure black.
The
multiplyblend mode is often used to highlight shadows, show contrast, or accentuate an aspect of a map. For example, you can usemultiplyblend mode on a topographic map displayed over hillshade when you want to have your elevation show through the topographic layer. See the intro to layer blending sample.The
multiplyanddarkenmodes can be used to have dark labels of the basemap to show through top layers. See the darken blending sample.The
color-burnmode works well with colorful top and background layers since it increases saturation in mid-tones. It increases the contrast by tinting pixels in overlapping areas in top and bottom layers more towards the top layer color. Use this blend mode, when you want an effect with more contrast thanmultiplyordarken.The following screenshots show how the
multiplyblend mode used for creating a physical map of the world that shows both boundaries and elevation.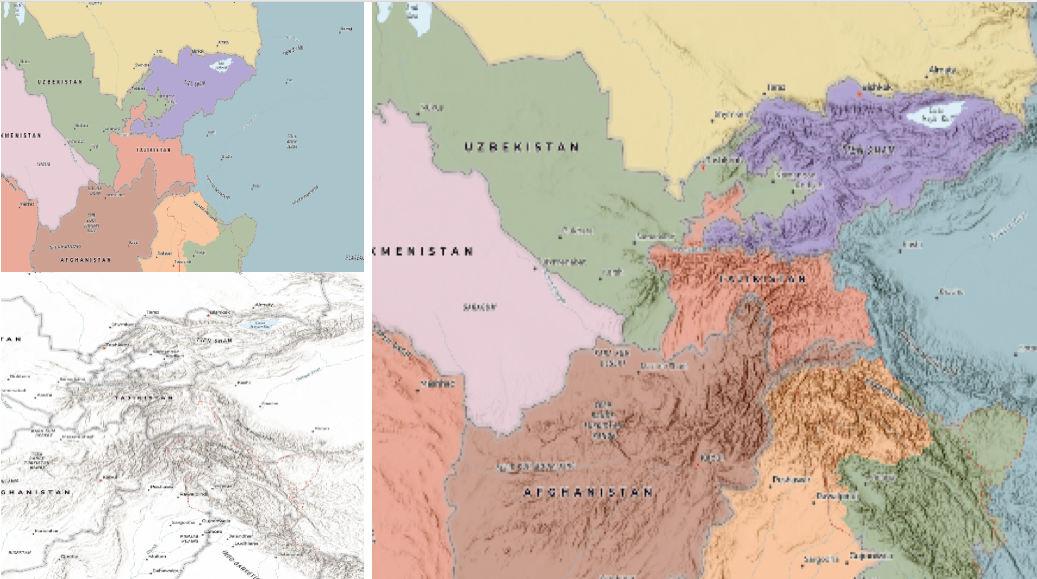
Blend mode Description darken Emphasizes the darkest parts of overlapping layers. Colors in the top layer become transparent if they are lighter than the overlapping colors in the background layer, allowing the background layer to show through completely. multiply Emphasizes the darkest parts of overlapping layers by multiplying colors of the top layer and the background layer. Midrange colors from top and background layers are mixed together more evenly. color-burn Intensifies the dark areas in all layers. It increases the contrast between top and background layers, by tinting colors in overlapping area towards the top color. To do this it inverts colors of the background layer, divides the result by colors of the top layer, then inverts the results. Contrast blend modes:
The following blend modes create contrast by both lightening the lighter areas and darkening the darker areas in the top layer by using lightening or darkening blend modes to create the blend. The contrast blend modes will lighten the colors lighter than 50% gray ([128,128,128]), and darken the colors darker than 50% gray. 50% gray will be transparent in the top layer. Each mode can create a variety of results depending on the colors of top and background layers being blended together. The
overlayblend mode makes its calculations based on the brightness of the colors in the background layer while all of the other contrast blend modes make their calculations based on the brightness of the top layer. Some of these modes are designed to simulate the effect of shining a light through the top layer, effectively projecting upon the layers beneath it.Contrast blend modes can be used to increase the contrast and saturation to have more vibrant colors and give a punch to your layers. For example, you can duplicate a layer and set
overlayblend mode on the top layer to increase the contrast and tones of your layer. You can also add a polygon layer with a white fill symbol over a dark imagery layer and applysoft-lightblend mode to increase the brightness in the imagery layer.The following screenshots show an effect of the
overlayblend mode on a GraphicsLayer. The left image shows when the buffer graphics layer has thenormalblend mode. As you can see, the gray color for the buffer polygon is blocking the intersecting census tracts. The right image shows when theoverlayblend mode is applied to the buffer graphics layer. Theoverlayblend mode darkens or lightens the gray buffer polygon depending on the colors of the background layer while the census tracts layer is shining through. See this in action.Normal blend mode Overlay blend mode 
Blend mode Description overlay Uses a combination of multiplyandscreenmodes to darken and lighten colors in the top layer with the background layer always shining through. The result is darker color values in the background layer intensify the top layer, while lighter colors in the background layer wash out overlapping areas in the top layer.soft-light Applies a half strength screenmode to lighter areas and and half strengthmultiplymode to darken areas of the top layer. You can think of thesoft-lightas a softer version of theoverlaymode.hard-light Multiplies or screens the colors, depending on colors of the top layer. The effect is similar to shining a harsh spotlight on the top layer. vivid-light Uses a combination of color-burnorcolor-dodgeby increasing or decreasing the contrast, depending on colors in the top layer.Component blend modes:
The following blend modes use primary color components, which are hue, saturation and luminosity to blend top and background layers. You can add a feature layer with a simple renderer over any layer and set
hue,saturation,colororluminosityblend mode on this layer. With this technique, you create a brand new looking map.The following screenshots show where the topo layer is blended with world hillshade layer with
luminosityblend mode. The result is a drastically different looking map which preserves the brightness of the topo layer while adapting the hue and saturation of the hillshade layer.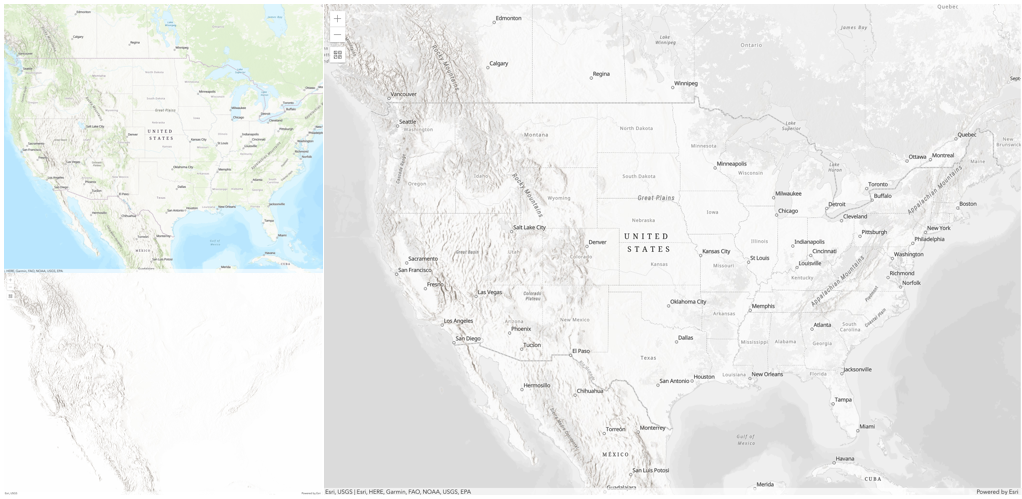
Blend mode Description hue Creates an effect with the hue of the top layer and the luminosity and saturation of the background layer. saturation Creates an effect with the saturation of the top layer and the hue and luminosity of the background layer. 50% gray with no saturation in the background layer will not produce any change. luminosity Creates effect with the luminosity of the top layer and the hue and saturation of the background layer. Can be thought of as the opposite of colorblend mode.color Creates an effect with the hue and saturation of the top layer and the luminosity of the background layer. Can be thought of as the opposite of luminosityblend mode.Composite blend modes:
The following blend modes can be used to mask the contents of top, background or both layers.
Destinationmodes are used to mask the data of the top layer with the data of the background layer.Sourcemodes are used to mask the data of the background layer with the data of the top layer.
The
destination-inblend mode can be used to show areas of focus such as earthquakes, animal migration, or point-source pollution by revealing the underlying map, providing a bird’s eye view of the phenomenon. Check out multiple blending and groupLayer blending samples to see composite blend modes in action.The following screenshots show feature and imagery layers on the left side on their own in the order they are drawn in the view. The imagery layer that contains land cover classification rasters. The feature layer contains 2007 county crops data. The right image shows the result of layer blending where
destination-inblendMode is set on the imagery layer. As you can see, the effect is very different from the original layers. The blended result shows areas of cultivated crops only (where both imagery and feature layers overlap).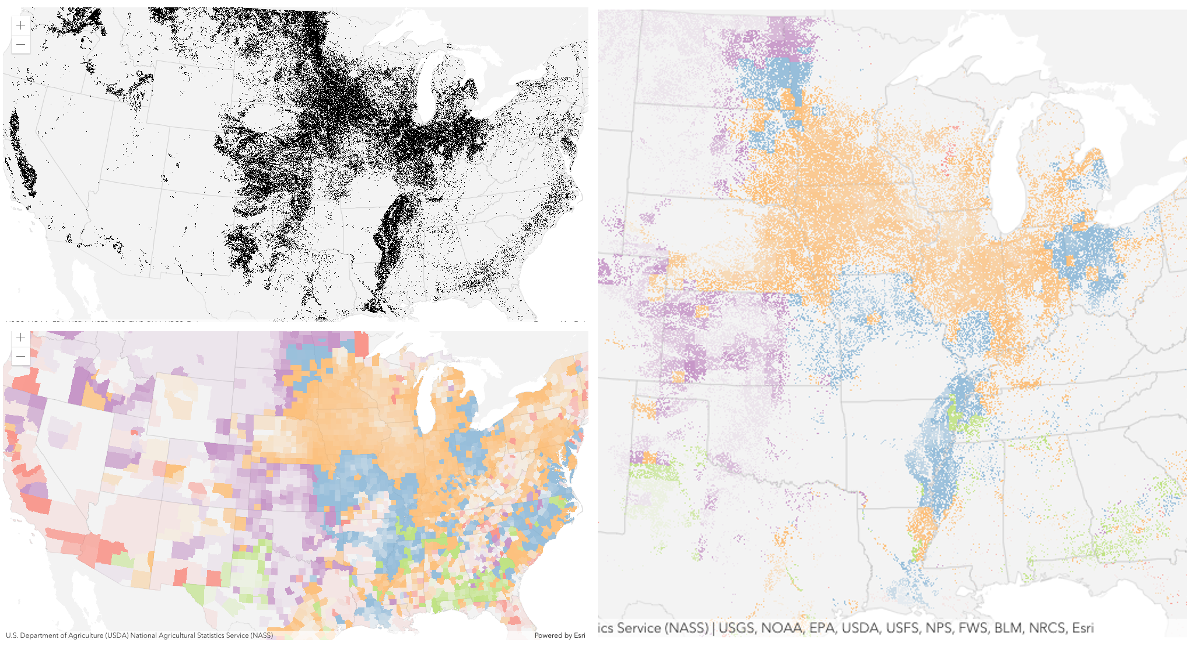
Blend mode Description destination-over Destination/background layer covers the top layer. The top layer is drawn underneath the destination layer. You'll see the top layer peek through wherever the background layer is transparent or has no data. destination-atop Destination/background layer is drawn only where it overlaps the top layer. The top layer is drawn underneath the background layer. You'll see the top layer peek through wherever the background layer is transparent or has no data. destination-in Destination/background layer is drawn only where it overlaps with the top layer. Everything else is made transparent. destination-out Destination/background layer is drawn where it doesn't overlap the top layer. Everything else is made transparent. source-atop Source/top layer is drawn only where it overlaps the background layer. You will see the background layer peek through where the source layer is transparent or has no data. source-in Source/top layer is drawn only where it overlaps with the background layer. Everything else is made transparent. source-out Source/top layer is drawn where it doesn't overlap the background layer. Everything else is made transparent. xor Top and background layers are made transparent where they overlap. Both layers are drawn normal everywhere else. Invert blend modes:
The following blend modes either invert or cancel out colors depending on colors of the background layer. These blend modes look for variations between top and background layers. For example, you can use
differenceorexclusionblend modes on two imagery layers of forest covers to visualize how forest covers changed from one year to another.The
invertblend mode can be used to turn any light basemap into a dark basemap to accommodate those who work in low-light conditions. The following screenshots show how setting theinvertblend mode set on a feature layer with a simple renderer turns the world terrain basemap into a dark themed basemap in no time.
Blend mode Description difference Subtracts the darker of the overlapping colors from the lighter color. When two pixels with the same value are subtracted, the result is black. Blending with black produces no change. Blending with white inverts the colors. This blending mode is useful for aligning layers with similar content. exclusion Similar to the differenceblend mode, except that the resulting image is lighter overall. Overlapping areas with lighter color values are lightened, while darker overlapping color values become transparent.minus Subtracts colors of the top layer from colors of the background layer making the blend result darker. In the case of negative values, black is displayed. invert Inverts the background colors wherever the top and background layers overlap. The invert blend mode inverts the layer similar to a photographic negative. reflect This blend mode creates effects as if you added shiny objects or areas of light in the layer. Black pixels in the background layer are ignored as if they were transparent. Possible Values:"average"|"color-burn"|"color-dodge"|"color"|"darken"|"destination-atop"|"destination-in"|"destination-out"|"destination-over"|"difference"|"exclusion"|"hard-light"|"hue"|"invert"|"lighten"|"lighter"|"luminosity"|"minus"|"multiply"|"normal"|"overlay"|"plus"|"reflect"|"saturation"|"screen"|"soft-light"|"source-atop"|"source-in"|"source-out"|"vivid-light"|"xor"
- Default Value:normal
- See also:
- Since: ArcGIS API for JavaScript 4.7
The name of the class. The declared class name is formatted as
esri.folder.className.
- effect EffectSince: ArcGIS API for JavaScript 4.18
Effect provides various filter functions that can be performed on the layer to achieve different visual effects similar to how image filters work. This powerful capability allows you to apply css filter-like functions to layers to create custom visual effects to enhance the cartographic quality of your maps. This is done by applying the desired effect to the layer's
effectproperty as a string or an array of objects to set scale dependent effects.Known Limitations
- The effect is not supported in 3D SceneViews.
- The effect is not supported in printing and in legend.
- Default Value:null
- See also:
Examples:// the following effect will be applied to the layer at all scales // brightness will be applied first, then hue-rotate followed by contrast // changing order of the effects will change the final result layer.effect = "brightness(5) hue-rotate(270deg) contrast(200%)";// set a scale dependent bloom effect on the layer layer.effect = [ { scale: 36978595, value: "drop-shadow(3px, 3px, 4px)" }, { scale: 18489297, value: "drop-shadow(2px, 2px, 3px)" }, { scale: 4622324, value: "drop-shadow(1px, 1px, 2px)" } ];
The full extent of the layer. By default, this is worldwide. This property may be used to set the extent of the view to match a layer's extent so that its features appear to fill the view. See the sample snippet below.
Example:// Once the layer loads, set the view's extent to the layer's fullextent layer.when(function(){ view.extent = layer.fullExtent; });
The unique ID assigned to the layer. If not set by the developer, it is automatically generated when the layer is loaded.
Indicates how the layer should display in the LayerList widget. The possible values are listed below.
Value Description show The layer is visible in the table of contents. hide The layer is hidden in the table of contents. hide-children If the layer is a GroupLayer, BuildingSceneLayer, KMLLayer, MapImageLayer, TileLayer or WMSLayer, hide the children layers from the table of contents. Possible Values:"show"|"hide"|"hide-children"
- Default Value:show
Indicates whether the layer's resources have loaded. When
true, all the properties of the object can be accessed.- Default Value:false
The Error object returned if an error occurred while loading.
- Default Value:null
Represents the status of a load operation.
Value Description not-loaded The object's resources have not loaded. loading The object's resources are currently loading. loaded The object's resources have loaded without errors. failed The object's resources failed to load. See loadError for more details. Possible Values:"not-loaded"|"loading"|"failed"|"loaded"
- Default Value:not-loaded
A list of warnings which occurred while loading.
- maxScale Number
The maximum scale (most zoomed in) at which the layer is visible in the view. If the map is zoomed in beyond this scale, the layer will not be visible. A value of
0means the layer does not have a maximum scale. The maxScale value should always be smaller than the minScale value, and greater than or equal to the service specification.- Default Value:0
Examples:// The layer will not be visible when the view is zoomed in beyond a scale of 1:1,000 layer.maxScale = 1000;// The layer's visibility is not restricted to a maximum scale. layer.maxScale = 0;
- minScale Number
The minimum scale (most zoomed out) at which the layer is visible in the view. If the map is zoomed out beyond this scale, the layer will not be visible. A value of
0means the layer does not have a minimum scale. The minScale value should always be larger than the maxScale value, and lesser than or equal to the service specification.- Default Value:0
Examples:// The layer will not be visible when the view is zoomed out beyond a scale of 1:3,000,000 layer.minScale = 3000000;// The layer's visibility is not restricted to a minimum scale. layer.minScale = 0;
The opacity of the layer. This value can range between
1and0, where0is 100 percent transparent and1is completely opaque.- Default Value:1
Example:// Makes the layer 50% transparent layer.opacity = 0.5;
- refreshInterval NumberSince: ArcGIS API for JavaScript 4.6
Refresh interval of the layer in minutes. Value of
0indicates no refresh.- Default Value:0
Example:// the layer will be refreshed every 6 seconds. layer.refreshInterval = 0.1;
- spatialReference SpatialReferenceautocast
The spatial reference of the layer.
- Default Value:class="hljs-built_in">module:esri/geometry/SpatialReference#WebMercator SpatialReference.WebMercator
The tiling scheme information for the layer.
- type Stringreadonly
For BaseTileLayer the type is
base-tile.Possible Values:"base-tile"|"bing-maps"
Indicates if the layer is visible in the View. When
false, the layer may still be added to a Map instance that is referenced in a view, but its features will not be visible in the view.- Default Value:true
Example:// The layer is no longer visible in the view layer.visible = false;
Method Overview
| Name | Return Type | Summary | Class | |
|---|---|---|---|---|
| Promise | Adds a promise to the layer's loadable chain. more details | more details | BaseTileLayer | |
Cancels a load() operation if it is already in progress. more details | more details | Layer | ||
| Promise<LayerView> | Called by the views, such as MapView and SceneView, when the layer is added to the Map.layers collection and a layer view must be created for it. more details | more details | Layer | |
Destroys the layer and any associated resources (including its portalItem, if it is a property on the layer). more details | more details | Layer | ||
| Boolean | Emits an event on the instance. more details | more details | Layer | |
| Promise<Object> | Fetches custom attribution data for the layer when it becomes available. more details | more details | Layer | |
| Promise<(HTMLImageElement|HTMLCanvasElement)> | This method fetches a tile for the given level, row and column present in the view. more details | more details | BaseTileLayer | |
| Number[] | Returns the bounds of the tile as an array of four numbers that be readily converted to an Extent object. more details | more details | BaseTileLayer | |
| String | This method returns a URL to an image for a given level, row and column. more details | more details | BaseTileLayer | |
| Boolean | Indicates whether there is an event listener on the instance that matches the provided event name. more details | more details | Layer | |
| Boolean |
| more details | Layer | |
| Boolean |
| more details | Layer | |
| Boolean |
| more details | Layer | |
| Promise | Loads the resources referenced by this class. more details | more details | Layer | |
| Object | Registers an event handler on the instance. more details | more details | Layer | |
Fetches all the data for the layer. more details | more details | BaseTileLayer | ||
| Promise |
| more details | Layer |
Method Details
- addResolvingPromise(promiseToLoad){Promise}
Adds a promise to the layer's loadable chain. This is typically used in the load() method to ensure that all loadable resources required for the layer to function are loaded prior to this layer resolving and becoming loaded.
Parameter:promiseToLoad PromiseA promise that must resolve for the layer to resolve and move from the
loadingstatus to being loaded.Returns:Type Description Promise Resolves when the given promiseresolves.- See also:
Example:// The requiredLayer must load() prior to the MyCustomTileLayer // resolving and moving to the "loaded" status. var MyCustomTileLayer = BaseTileLayer.createSubclass({ load: function() { var promise = this.requiredLayer.load(); this.addResolvingPromise(promise); } });
Called by the views, such as MapView and SceneView, when the layer is added to the Map.layers collection and a layer view must be created for it. This method is used internally and there is no use case for invoking it directly.
Parameters:view *The parent view.
options ObjectoptionalAn object specifying additional options. See the object specification table below for the required properties of this object.
Specification:signal AbortSignaloptionalA signal to abort the creation of the layerview.
Returns:Type Description Promise<LayerView> Resolves with a LayerView instance. - See also:
- destroy()inheritedSince: ArcGIS API for JavaScript 4.17
Destroys the layer and any associated resources (including its portalItem, if it is a property on the layer). The layer can no longer be used once it has been destroyed.
The destroyed layer will be removed from its parent object like Map, WebMap, WebScene, Basemap, Ground, or GroupLayer.
- Since: ArcGIS API for JavaScript 4.5
Emits an event on the instance. This method should only be used when creating subclasses of this class.
Parameters:type StringThe name of the event.
event ObjectoptionalThe event payload.
Returns:Type Description Boolean trueif a listener was notified
Fetches custom attribution data for the layer when it becomes available.
Returns:Type Description Promise<Object> Resolves to an object containing custom attribution data for the layer.
- fetchTile(level, row, col, options){Promise<(HTMLImageElement|HTMLCanvasElement)>}
This method fetches a tile for the given level, row and column present in the view. Override this method if the data or image returned from the server needs to be processed before it can be displayed.
Parameters:Specification:level NumberLevel of detail of the tile to fetch. This value is provided by LayerView.
row NumberThe row (y) position of the tile fetch. This value is provided by LayerView.
col NumberThe column (x) position of the tile to fetch. This value is provided by LayerView.
options ObjectoptionalOptional settings for the tile request. The options have the following properties.
Specification:timestamp BooleanoptionalNumber to append to the tile request to prevent fetching the tile from the browser cache.
signal AbortSignaloptionalAn AbortSignal to abort the request. When overriding fetchTile,
signalshould be handled, for example by passing it on to request or by aborting pending operations. An aborted call to fetchTile should reject its returned promise with an instance of Error.Returns:Type Description Promise<(HTMLImageElement|HTMLCanvasElement)> Returns a promise that resolves to an HTMLImageElement or HTMLCanvasElement. Example:// Process the image returned from the server before // it is displayed. fetchTile: function (level, row, col, options) { // call getTileUrl method to construct the URL for // the image for the given level, row and col var url = this.getTileUrl(level, row, col); // request for the tile based on the generated url. // the signal option ensures that obsolete requests are aborted. return esriRequest(url, { responseType: "image", signal: options && options.signal }) .then(function (response) { // get the image from the response var image = response.data; var width = this.tileInfo.size[0]; var height = this.tileInfo.size[0]; var canvas = document.createElement("canvas"); canvas.width = width; canvas.height = height; var context = canvas.getContext("2d"); // tint is a custom property of this layer // Apply the tint color provided by the application // to the canvas if (this.tint) { context.fillStyle = this.tint.toCss(); context.fillRect(0, 0, width, height); // The pixels of the top layer are multiplied by the corresponding // pixel of the bottom layer. A darker picture is the result. context.globalCompositeOperation = "multiply"; } context.drawImage(image, 0, 0, width, height); return canvas; }.bind(this)); }
Returns the bounds of the tile as an array of four numbers that be readily converted to an Extent object. The value for each item in the array is described in the following table:
Index Value 0 Minimum x-value 1 Minimum y-value 2 Maximum x-value 3 Maximum y-value Parameters:level NumberThe level of detail (LOD) of the tile.
row NumberThe tile's row (y) position in the dataset.
column NumberThe tiles column (x) position in the dataset.
optional Array for storing the tile bounds or extent.
Returns:Type Description Number[] Returns an array representing the tile bounds or extent.
- getTileUrl(level, row, col){String}
This method returns a URL to an image for a given level, row and column. Override this method to construct the URL for the image based on user interaction.
Parameters:level NumberLevel of detail. This value is provided by the LayerView.
row NumberTile row. This value is provided by the LayerView.
col NumberTile column. This value is provided by the LayerView.
Returns:Type Description String Returns the URL to the tile image. Example:// generate the tile url for a given level, row and column getTileUrl: function (level, row, col) { // urlTemplate is a property of the custom layer. // value is provided by the application return this.urlTemplate.replace("{z}", level).replace("{x}", col).replace("{y}", row); },
Indicates whether there is an event listener on the instance that matches the provided event name.
Parameter:type StringThe name of the event.
Returns:Type Description Boolean Returns true if the class supports the input event.
isFulfilled()may be used to verify if creating an instance of the class is fulfilled (either resolved or rejected). If it is fulfilled,truewill be returned.Returns:Type Description Boolean Indicates whether creating an instance of the class has been fulfilled (either resolved or rejected).
isRejected()may be used to verify if creating an instance of the class is rejected. If it is rejected,truewill be returned.Returns:Type Description Boolean Indicates whether creating an instance of the class has been rejected.
isResolved()may be used to verify if creating an instance of the class is resolved. If it is resolved,truewill be returned.Returns:Type Description Boolean Indicates whether creating an instance of the class has been resolved.
Loads the resources referenced by this class. This method automatically executes for a View and all of the resources it references in Map if the view is constructed with a map instance.
This method must be called by the developer when accessing a resource that will not be loaded in a View.
The
load()method only triggers the loading of the resource the first time it is called. The subsequent calls return the same promise.It's possible to provide a
signalto stop being interested into aLoadableinstance load status. When the signal is aborted, the instance does not stop its loading process, only cancelLoad can abort it.Parameter:signal AbortSignaloptionalSignal object that can be used to abort the asynchronous task. The returned promise will be rejected with an Error named
AbortErrorwhen an abort is signaled. See also AbortController for more information on how to construct a controller that can be used to deliver abort signals.Returns:Type Description Promise Resolves when the resources have loaded.
Registers an event handler on the instance. Call this method to hook an event with a listener.
Parameters:A event type, or an array of event types, to listen for.
listener FunctionThe function to call when the event is fired.
Returns:Type Description Object Returns an event handler with a remove()method that can be called to stop listening for the event(s).Property Type Description remove Function When called, removes the listener from the event. Example:view.on("click", function(event){ // event is the event handle returned after the event fires. console.log(event.mapPoint); });
- refresh()Since: ArcGIS API for JavaScript 4.6
Fetches all the data for the layer.
- Since: ArcGIS API for JavaScript 4.6
when()may be leveraged once an instance of the class is created. This method takes two input parameters: acallbackfunction and anerrbackfunction. Thecallbackexecutes when the instance of the class loads. Theerrbackexecutes if the instance of the class fails to load.Parameters:callback FunctionoptionalThe function to call when the promise resolves.
errback FunctionoptionalThe function to execute when the promise fails.
Returns:Type Description Promise Returns a new promise for the result of callbackthat may be used to chain additional functions.Example:// Although this example uses MapView, any class instance that is a promise may use when() in the same way var view = new MapView(); view.when(function(){ // This function will execute once the promise is resolved }, function(error){ // This function will execute if the promise is rejected due to an error });
Event Overview
| Name | Type | Summary | Class | |
|---|---|---|---|---|
{view: View,layerView: LayerView} | Fires after the layer's LayerView is created and rendered in a view. more details | more details | Layer | |
{view: View,error: Error} | Fires when an error emits during the creation of a LayerView after a layer has been added to the map. more details | more details | Layer | |
{view: View,layerView: LayerView} | Fires after the layer's LayerView is destroyed and no longer renders in a view. more details | more details | Layer |
Event Details
- layerview-createinherited
Fires after the layer's LayerView is created and rendered in a view.
- Properties:
- view View
The view in which the
layerViewwas created.layerView LayerViewThe LayerView rendered in the view representing the layer in
layer. - See also:
Example:// This function will fire each time a layer view is created for this // particular view. layer.on("layerview-create", function(event){ // The LayerView for the layer that emitted this event event.layerView; });
- layerview-create-errorinherited
Fires when an error emits during the creation of a LayerView after a layer has been added to the map.
- Properties:
- view View
The view that failed to create a layerview for the layer emitting this event.
error ErrorAn error object describing why the layer view failed to create.
- See also:
Example:// This function fires when an error occurs during the creation of the layer's layerview layer.on("layerview-create-error", function(event) { console.error("LayerView failed to create for layer with the id: ", layer.id, " in this view: ", event.view); });